Render Word documents as HTML, PDF, and image files Leave feedback
On this page
GroupDocs.Viewer for Node.js allows you to render your Microsoft Word documents in HTML, PDF, PNG, and JPEG formats. You do not need to use Microsoft Word or other word processors to load and view Word documents within your JavaScript application (web or desktop).
To start using the GroupDocs.Viewer API, create a Viewer class instance. Pass a document you want to view to the class constructor. You can load the document from a file or stream. Call one of the Viewer.view method overloads to convert the document to HTML, PDF, or image format. These methods allow you to render the entire document or specific pages.
GroupDocs.Viewer supports the following Word Processing file formats:
- Microsoft Word Document (.DOCX)
- Microsoft Word 97-2003 Document (.DOC)
- Microsoft Word Macro-Enabled Document (.DOCM)
- Microsoft Word 97-2003 Template (.DOT)
- Microsoft Word Macro-Enabled Template (.DOTM)
- Microsoft Word Template (.DOTX)
- OpenDocument Text (.ODT)
- OpenDocument Text Template (.OTT)
- Rich Text Document (.RTF)
- Plain Text Document (.TXT)
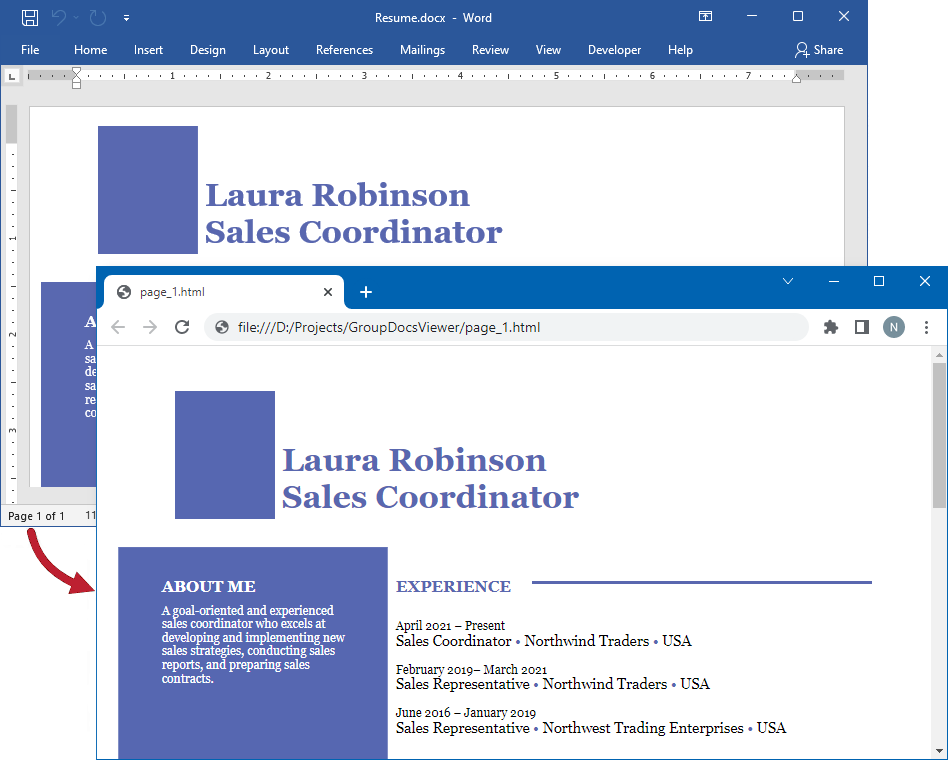
Create an HtmlViewOptions class instance and pass it to the Viewer.view method to convert a Word file to HTML. The HtmlViewOptions class properties allow you to control the conversion process. For instance, you can embed all external resources in the generated HTML file, minify the output file, and optimize it for printing. Refer to the following documentation section for details: Rendering to HTML.
To save all elements of an HTML page (including text, graphics, and stylesheets) into a single file, call the HtmlViewOptions.forEmbeddedResources method and specify the output file name.
import { Viewer, HtmlViewOptions } from '@groupdocs/groupdocs.viewer';

const viewer = new Viewer("resume.docx")
// Create an HTML files.
// {0} is replaced with the current page number in the file name.
const viewOptions = HtmlViewOptions.forEmbeddedResources("render-word-to-html-embedded-resources/docx-to-html-page_{0}.html")
viewer.view(viewOptions)
resume.docx is the sample file used in this example. Click here to download it.
The following image demonstrates the result:
If you want to store an HTML file and additional resource files (such as fonts, images, and stylesheets) separately, call the HtmlViewOptions.forExternalResources method and pass the following parameters:
- The output file path format
- The path format for the folder with external resources
- The resource URL format
import { Viewer, HtmlViewOptions } from '@groupdocs/groupdocs.viewer';

const viewer = new Viewer("resume.docx")
// Create an HTML file for each page.
// Specify the HTML file names and location of external resources.
// {0} and {1} are replaced with the current page number and resource name, respectively.
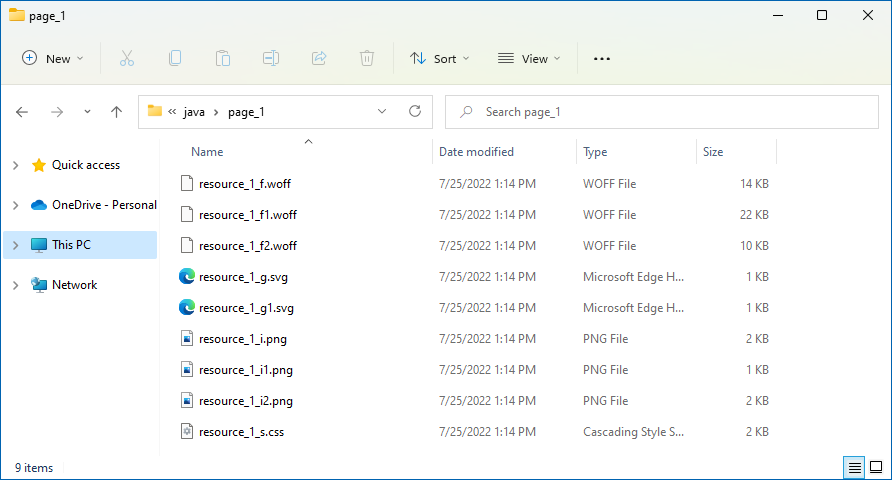
const viewOptions = HtmlViewOptions.forExternalResources("render-word-to-html-external-resources/docx-to-html-page_{0}.html", "render-word-to-html-external-resources/docx-to-html-page_{0}/resource_{0}_{1}", "render-word-to-html-external-resources/docx-to-html-page_{0}/resource_{0}_{1}")
viewer.view(viewOptions)
resume.docx is the sample file used in this example. Click here to download it.
The image below demonstrates the result. External resources are placed in a separate folder.
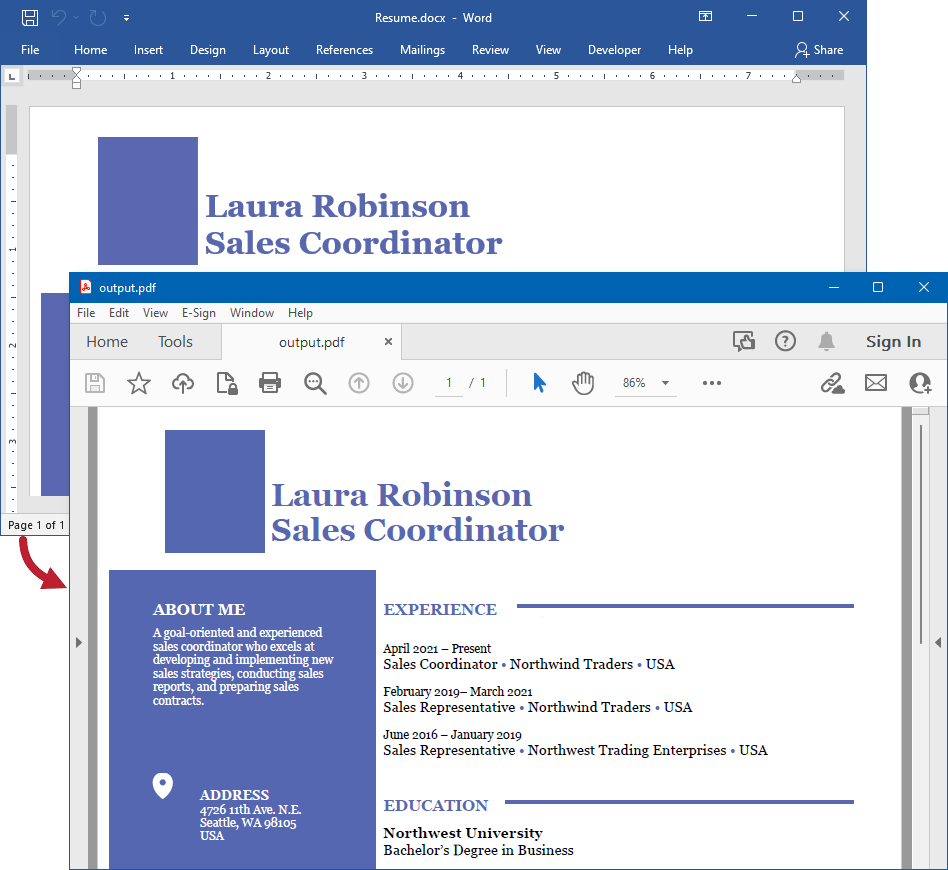
Create a PdfViewOptions class instance and pass it to the Viewer.view method to convert a Word file to PDF. The PdfViewOptions class properties allow you to control the conversion process. For instance, you can protect the output PDF file, reorder its pages, and specify the quality of document images. Refer to the following documentation section for details: Rendering to PDF.
import { Viewer, PdfViewOptions } from '@groupdocs/groupdocs.viewer';

const viewer = new Viewer("resume.docx")
// Create a PDF file for the document.
// Specify the PDF file name.
const viewOptions = PdfViewOptions("render-word-to-pdf/docx-to-pdf.pdf")
viewer.view(viewOptions)
resume.docx is the sample file used in this example. Click here to download it.
The following image demonstrates the result:
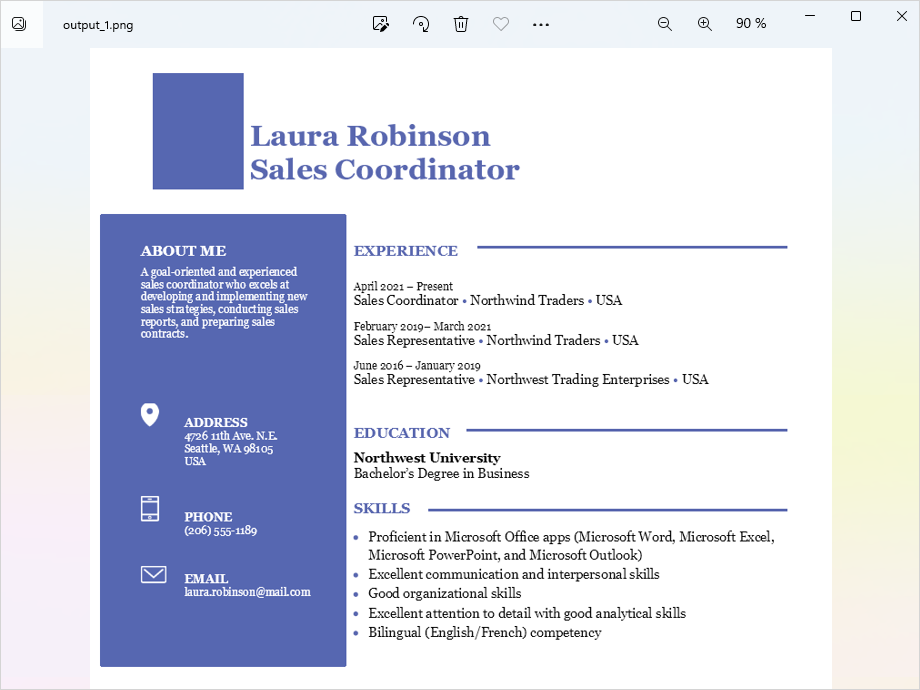
Create a PngViewOptions class instance and pass it to the Viewer.view method to convert a Word file to PNG. Use the PngViewOptions.setHeight and PngViewOptions.setWidth methods to specify the output image size in pixels.
import { Viewer, PngViewOptions } from '@groupdocs/groupdocs.viewer';

const viewer = new Viewer("resume.docx")
// Create a PNG image for each document page.
// {0} is replaced with the current page number in the image name.
const viewOptions = PngViewOptions("render-word-to-png/docx-to-png-page_{0}.png")
viewer.view(viewOptions)
resume.docx is the sample file used in this example. Click here to download it.
Create a JpgViewOptions class instance and pass it to the Viewer.view method to convert a Word file to JPEG. Use the JpgViewOptions.setHeight and JpgViewOptions.setWidth methods to specify the output image size in pixels.
import { Viewer, JpgViewOptions } from '@groupdocs/groupdocs.viewer';

const viewer = new Viewer("resume.docx")
// Create a JPG image for each document page.
// {0} is replaced with the current page number in the image name.
const viewOptions = JpgViewOptions("render-word-to-jpeg/docx-to-jpg-page_{0}.jpg")
viewer.view(viewOptions)
resume.docx is the sample file used in this example. Click here to download it.
Use the following methods to specify the size of page margins in the output files when you convert your Word documents to HTML, PDF, and image formats:
- WordProcessingOptions.setTopMargin specifies the distance (in points) between document content and the top edge of the page.
- WordProcessingOptions.setBottomMargin specifies the distance (in points) between document content and the bottom edge of the page.
- WordProcessingOptions.setLeftMargin specifies the distance (in points) between document content and the left edge of the page.
- WordProcessingOptions.setRightMargin specifies the distance (in points) between document content and the right edge of the page.
You can access these methods for the following classes:
The example below converts a Word document to HTML and specifies page margins for the output file.
import { Viewer, HtmlViewOptions } from '@groupdocs/groupdocs.viewer';
import java from 'java';

const viewer = new Viewer("resume.docx")
// Create an HTML file for each document page.
// {0} is replaced with the current page number in the file name.
const viewOptions = HtmlViewOptions.forEmbeddedResources("render-word-with-page-margins/docx-to-html-page_{0}.html")
// Specify the size of page margins in points.
viewOptions.getWordProcessingOptions().setTopMargin(java.newDouble(72.0))
viewOptions.getWordProcessingOptions().setBottomMargin(java.newDouble(72.0))
viewOptions.getWordProcessingOptions().setLeftMargin(java.newDouble(54.0))
viewOptions.getWordProcessingOptions().setRightMargin(java.newDouble(54.0))
viewer.view(viewOptions)
resume.docx is the sample file used in this example. Click here to download it.
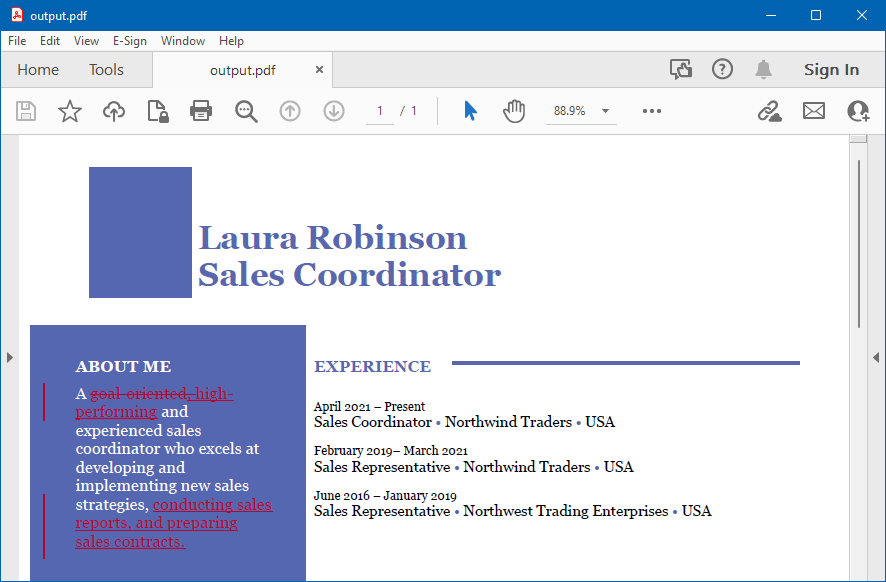
GroupDocs.Viewer does not render tracked changes (revisions made to a Word document) by default. If you want to display tracked changes in the output file, use the WordProcessingOptions.setRenderTrackedChanges method for one of the following classes (depending on the output file format):
The following code example demonstrates how to render a Word document with tracked changes:
import { Viewer, PdfViewOptions } from '@groupdocs/groupdocs.viewer';

const viewer = new Viewer("resume.docx")
// Convert the document to PDF.
const viewOptions = PdfViewOptions("render-word-with-tracked-changes/docx-to-pdf.pdf")
// Enable tracked changes rendering.
viewOptions.getWordProcessingOptions().setRenderTrackedChanges(true)
viewer.view(viewOptions)
resume.docx is the sample file used in this example. Click here to download it.
The following image illustrates the result:
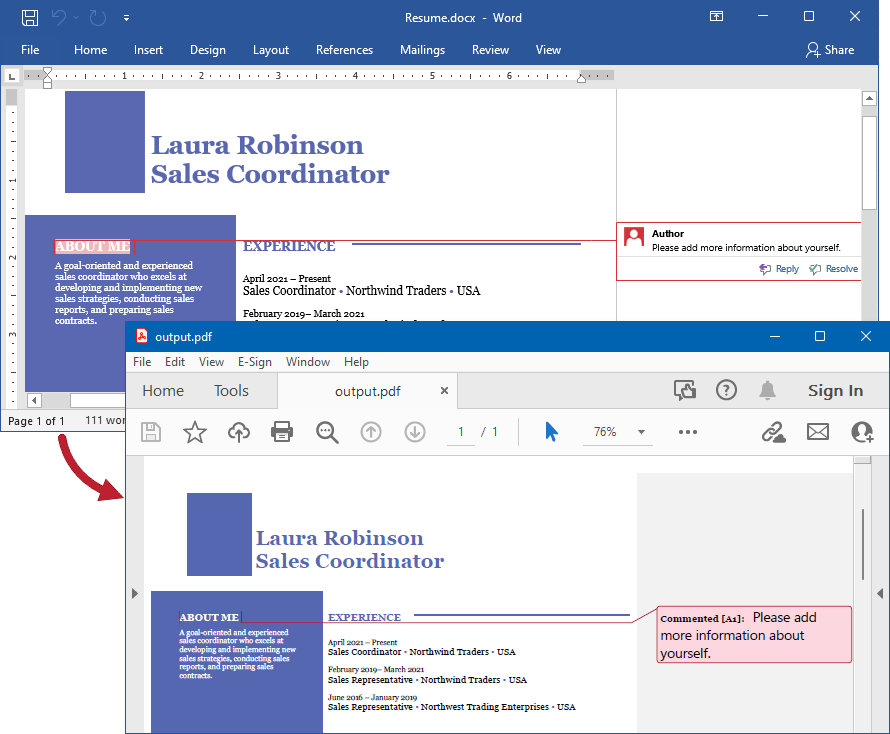
Use the ViewOptions.setRenderComments method for a target view to display comments in the output file when you convert your document to HTML, PDF, PNG, or JPEG format.
The code example below renders a Word document with comments to PDF.
import { Viewer, PdfViewOptions } from '@groupdocs/groupdocs.viewer';

const viewer = new Viewer("resume.docx")
// Convert the document to PDF.
const viewOptions = PdfViewOptions("render-word-with-comments/docx-to-pdf.pdf")
// Enable rendering comments.
viewOptions.setRenderComments(true)
viewer.view(viewOptions)
resume.docx is the sample file used in this example. Click here to download it.
The following image illustrates the result:
Before version 26.9, when rendering loaded WordProcessing documents to the raster formats (PNG and JPEG), the horizontal and vertical resolution of the output image was always fixed and equal to 96 DPI (Dots Per Inch). As a result, it was impossible to significantly increase the quality of produced images. To solve this problem, version 26.9 adds two new methods to the WordProcessingOptions class — setHorizontalResolution and setVerticalResolution, both accepting an int value for the horizontal and vertical resolution respectively.
By default their values are 96 DPI — same as in all previous versions of GroupDocs.Viewer. But now you can change these values. The minimum possible value is 72 DPI — even if a lesser number is set, 72 DPI is applied. There is also a maximum possible value — 600 DPI. Even if a larger number is specified, 600 DPI is applied. This is true for both horizontal and vertical resolution.
These two options are valid only when rendering to the PNG and JPEG formats; for other formats they are ignored.
The source code below demonstrates rendering a loaded DOCX file to PNG with both horizontal and vertical resolutions set to 192 DPI, and to JPEG where horizontal resolution stays at the default (96 DPI) and only the vertical resolution is set to 120 DPI.
import { Viewer, PngViewOptions, JpgViewOptions } from '@groupdocs/groupdocs.viewer';

const pngOpt = new PngViewOptions()
pngOpt.getWordProcessingOptions().setHorizontalResolution(192)
pngOpt.getWordProcessingOptions().setVerticalResolution(192)

const jpegOpt = new JpgViewOptions()
jpegOpt.getWordProcessingOptions().setVerticalResolution(120)

const viewer = new Viewer("sample.docx")
viewer.view(pngOpt)
viewer.view(jpegOpt)
By default GroupDocs.Viewer renders input WordProcessing documents “as-is”, without any changes. This applies to page numbers as well: when they are present in the original file, they also appear in the output PDF, HTML, PNG, and JPEG, and vice versa. Initially there was no way to forcibly add page numbers to the produced output documents.
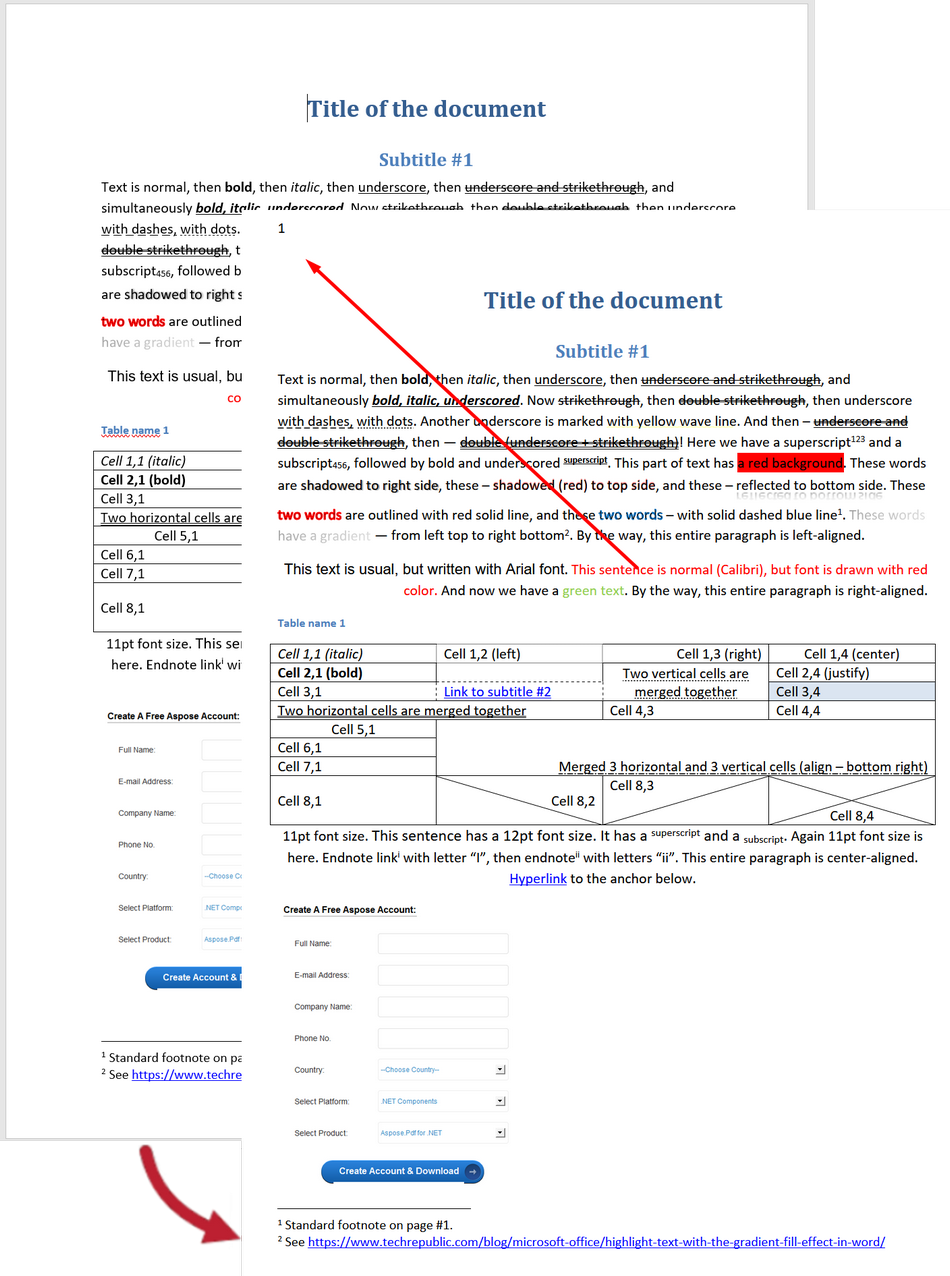
This changed in version 26.9. Starting from this version it is possible to apply page numeration to WordProcessing documents. Important note: the input WordProcessing file is not changed in any case regardless of which options are applied. The described feature modifies only the output documents generated by GroupDocs.Viewer from input Word files.
A new property PageNumberLocation was added to the WordProcessingOptions class. It is of the enum type WordsPageNumberLocation, and its default value is NOT_APPLY — this means that by default input WordProcessing documents are rendered as before: when an input document has page numbers, they are present in the output documents, and when it does not — page numbers are absent. When any other value of WordsPageNumberLocation except NOT_APPLY is specified, GroupDocs.Viewer forcibly adds page numbers to the produced output documents. If the original document already had page numbers, they are initially removed from the output documents, and then the new page numbers are added.
The WordsPageNumberLocation enum both forcibly applies page numbers and specifies their position on the page: TOP_LEFT, TOP_CENTER, TOP_RIGHT, BOTTOM_LEFT, BOTTOM_CENTER, BOTTOM_RIGHT.
Page numbers with different locations can be applied to different output formats for the same input WordProcessing document. The code sample below shows applying page numbers in the top left corner to the output PDF and page numbers in the bottom center to the output HTML.
import { Viewer, PdfViewOptions, HtmlViewOptions, WordsPageNumberLocation } from '@groupdocs/groupdocs.viewer';

const pdfOpt = new PdfViewOptions()
pdfOpt.getWordProcessingOptions().setPageNumberLocation(WordsPageNumberLocation.TOP_LEFT)

const htmlEmbeddedOpt = HtmlViewOptions.forEmbeddedResources()
htmlEmbeddedOpt.getWordProcessingOptions().setPageNumberLocation(WordsPageNumberLocation.BOTTOM_CENTER)

const viewer = new Viewer("sample.docx")
viewer.view(pdfOpt)
viewer.view(htmlEmbeddedOpt)
The following collage illustrates the result of adding page numbers to a loaded DOCX file during rendering to HTML:
Was this page helpful?
Any additional feedback you'd like to share with us?
Please tell us how we can improve this page.
Thank you for your feedback!
We value your opinion. Your feedback will help us improve our documentation.